Feedback Form
|
|
Start of Tutorial > Start of Trail > Start of Lesson |
Search
Feedback Form |
You might not need the information in this section at all. However, if your components don't seem to be painting themselves correctly, understanding the concepts in this section might help you figure out what's wrong. If you plan to create custom painting code for a component, this section is required reading.
When a Swing GUI needs to paint itself -- whether for the first time, in response to becoming unhidden, or because it needs to reflect a change in the program's state -- it starts with the highest component that needs to be repainted and works its way down the containment hierarchy. This process is orchestrated by the AWT painting system, and made more efficient and smooth by the Swing repaint manager and double-buffering code.Swing components generally repaint themselves whenever necessary. When you invoke the
setTextmethod on a component, for example, the component should automatically repaint itself and, if appropriate, resize itself. If it doesn't, it's a bug. The workaround is to invoke therepaintmethod on the component to request that the component be scheduled for painting. If the component's size or position needs to change but doesn't do so automatically, you should invokerevalidateupon the component before invokingrepaint.Like event-handling code, painting code executes on the event-dispatching thread. While an event is being handled, no painting will occur. Similarly, if a painting operation takes a long time, no events will be handled during that time.
Programs should paint only when the painting system tells them to because each occurrence of a component painting itself must execute without interruption. Otherwise, unpredictable results could occur, such as a button being painted as half pressed and half unpressed.
For smoothness, Swing painting is double-buffered by default -- performed to an offscreen buffer and then flushed to the screen once finished. It might slightly help performance if you make a Swing component opaque, so that the Swing painting system can know not to paint anything behind the component. To make a Swing component opaque, invoke
setOpaque(true)on the component.Although their available painting area is always rectangular, non-opaque Swing components can appear to be any shape. A button, for instance, might display itself by painting a filled octagon. The component behind the button (its container, most likely) would then be visible, showing through at the corners of the button's bounds. The button would have to include special hit detection code to avoid acting pressed if the user happens to click on its corners.
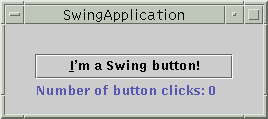
To illustrate painting, we'll use theSwingApplicationprogram, which is explained in A Quick Tour of a Swing Application's Code. Here is
SwingApplication's GUI:Here, again, is its containment hierarchy: When the GUI for
SwingApplicationis painted, here's what happens:In this way, each component paints itself before any of the components it contains. This ensures that the background of a
- The top-level container,
JFrame, paints itself.- The content pane first paints its background, which is a solid gray rectangle. It then tells the
JPanelto paint itself. The content pane's background rectangle doesn't actually appear in the finished GUI because the content pane is completely obscured by theJPanel.
Note: It's important that the content pane be opaque. Otherwise, messy repaints will result. Because theJPanelis opaque, we could make it the content pane (by substitutingsetContentPanefor the existing codegetContentPane().add). This would slightly simplify the containment hierarchy and painting by removing an unnecessary container.
- The
JPanelfirst paints its background, a solid gray rectangle. Next, it paints its border. The border is anEmptyBorder, which has no effect except for increasing theJPanel's size by reserving some space at the edge of the panel. Finally, the panel asks its children to paint themselves.- To paint itself, the
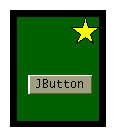
JButtonpaints its background rectangle, if necessary, and then paints the text that it contains. If the button has the keyboard focus, meaning that any typing goes directly to the button for processing, then the button does some look-and-feel-specific painting to make clear that it has the focus.- To paint itself, the
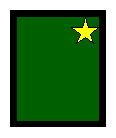
JLabelpaints its text.JPanel, for example, is visible only where it isn't covered by painting performed by one of the components it contains. The following figure illustrates the order in which each component that inherits fromJComponentpaints itself:For more information on how to paint, see the Working with Graphics
1. background
(if opaque)2. custom
painting
(if any)3. border
(if any)4. children
(if any)
|
|
Start of Tutorial > Start of Trail > Start of Lesson |
Search
Feedback Form |