Feedback Form
|
|
Start of Tutorial > Start of Trail > Start of Lesson |
Search
Feedback Form |
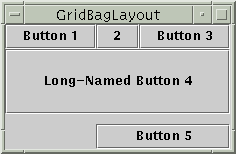
Here, again, is the applet that shows aGridBagLayoutin action.
This is a picture of the applet's GUI. To run the applet, click the picture. The applet will appear in a new browser window.The following code creates the
GridBagLayoutand the components it manages. You can find the entire source file inGridBagWindow.java. The program runs either within an applet (with the help of
AppletButtonJButton button; Container contentPane = getContentPane(); GridBagLayout gridbag = new GridBagLayout(); GridBagConstraints c = new GridBagConstraints(); contentPane.setLayout(gridbag); c.fill = GridBagConstraints.HORIZONTAL; button = new JButton("Button 1"); c.weightx = 0.5; c.gridx = 0; c.gridy = 0; gridbag.setConstraints(button, c); contentPane.add(button); button = new JButton("2"); c.gridx = 1; c.gridy = 0; gridbag.setConstraints(button, c); contentPane.add(button); button = new JButton("Button 3"); c.gridx = 2; c.gridy = 0; gridbag.setConstraints(button, c); contentPane.add(button); button = new JButton("Long-Named Button 4"); c.ipady = 40; //make this component tall c.weightx = 0.0; c.gridwidth = 3; c.gridx = 0; c.gridy = 1; gridbag.setConstraints(button, c); contentPane.add(button); button = new JButton("Button 5"); c.ipady = 0; //reset to default c.weighty = 1.0; //request any extra vertical space c.anchor = GridBagConstraints.SOUTH; //bottom of space c.insets = new Insets(10,0,0,0); //top padding c.gridx = 1; //aligned with button 2 c.gridwidth = 2; //2 columns wide c.gridy = 2; //third row gridbag.setConstraints(button, c); contentPane.add(button);This example uses one
GridBagConstraintsinstance for all the components theGridBagLayoutmanages. Just before each component is added to the container, the code sets (or resets to default values) the appropriate instance variables in theGridBagConstraintsobject. It then uses thesetConstraintsmethod to record all the constraint values for that component.For example, to make button 4 be extra tall, the example has this code:
And before setting the constraints of the next component, the code resets the value ofc.ipady = 40;ipadyto the default:For clarity, here's a table that shows all the constraints for each component thec.ipady = 0;GridBagLayouthandles. Values that aren't the default are marked in bold font. Values that are different from those in the previous table entry are marked in italic font.
Component Constraints All components Button 1 Button 2 Button 3 Button 4 Button 5 All the components in this container are as wide as possible, given the cells that they occupy. The program accomplishes this by setting the
GridBagConstraintsfillinstance variable toGridBagConstraints.HORIZONTAL, leaving it at that setting for all the components. If the program didn't specify the fill, the buttons would be at their natural width, like this:This program has two components that span multiple columns (buttons 4 and 5). To make button 4 tall, we added internal padding (
ipady) to it. To put space between buttons 4 and 5, we used insets to add a minimum of 10 pixels above button 5, and we made button 5 hug the south edge of its cell.When you enlarge the window the program brings up, the columns grow proportionately. This is because each component in the first row, where each component is one column wide, has
weightx = 1.0. The actual value of these components'weightxis unimportant. What matters is that all the components, and consequently, all the columns, have an equal weight that is greater than 0. If no component managed by theGridBagLayouthadweightxset, then when the components' container was made wider, the components would stay clumped together in the center of the container, like this:Note that if you enlarge the window, the last row is the only one that gets taller. This is because only button 5 has
weightygreater than zero.
|
|
Start of Tutorial > Start of Trail > Start of Lesson |
Search
Feedback Form |