Feedback Form
|
|
Start of Tutorial > Start of Trail > Start of Lesson |
Search
Feedback Form |
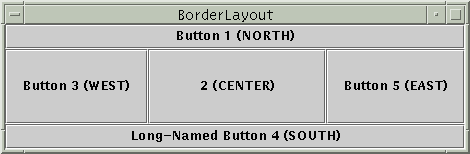
Here's an applet that shows aBorderLayoutin action.
This is a picture of the applet's GUI. To run the applet, click the picture. The applet will appear in a new browser window.As the preceding applet shows, a
BorderLayouthas five areas: north, south, east, west, and center. If you enlarge the window, the center area gets as much of the available space as possible. The other areas expand only as much as necessary to fill all available space. Often, a container uses only one or two of the areas of theBorderLayout-- just the center, or center and south, for example.The following code creates the
BorderLayoutand the components it manages. You can find the whole program inBorderWindow.java. The program runs either within an applet (with the help of
AppletButtonContainer contentPane = getContentPane(); //Use the content pane's default BorderLayout. //contentPane.setLayout(new BorderLayout()); //unnecessary contentPane.add(new JButton("Button 1 (NORTH)"), BorderLayout.NORTH); contentPane.add(new JButton("2 (CENTER)"), BorderLayout.CENTER); contentPane.add(new JButton("Button 3 (WEST)"), BorderLayout.WEST); contentPane.add(new JButton("Long-Named Button 4 (SOUTH)"), BorderLayout.SOUTH); contentPane.add(new JButton("Button 5 (EAST)"), BorderLayout.EAST);
Important: When adding a component to a container that usesBorderLayout, specify the component's location as one of the arguments to theaddmethod. Do not rely on the component being added to the center, by default. If you find that a component is missing from a container controlled by aBorderLayout, make sure that you specified the component's location and that you didn't put another component in the same location.All our examples that use
BorderLayoutspecify the component as the first argument to theaddmethod. For example:However, you might see code in other programs that specifies the component second. For example, the following are alternate ways of writing the preceding code:add(component, BorderLayout.CENTER) //preferredadd(BorderLayout.CENTER, component) //valid but old-fashioned or add("Center", component) //valid but error prone
By default, aBorderLayoutputs no gap between the components it manages. In the preceding applet, any apparent gaps are the result of the buttons reserving extra space around their apparent display area. You can specify gaps (in pixels) using the following constructor:You can also use the following methods to set the horizontal and vertical gaps, respectively:BorderLayout(int horizontalGap, int verticalGap)void setHgap(int) void setVgap(int)
The following table lists some of the many examples that useBorderLayout.
Example Where Described Notes BorderWindowThis page Puts a component in each of the five possible locations. TabbedPaneDemoHow to Use Tabbed Panes One of many examples that puts a single component in the center of a content pane, so that the component is as large as possible. CheckBoxDemoHow to Use Check Boxes Creates a JPanelthat uses aBorderLayout. Puts components into the west and center locations.
|
|
Start of Tutorial > Start of Trail > Start of Lesson |
Search
Feedback Form |