Feedback Form
|
|
Start of Tutorial > Start of Trail > Start of Lesson |
Search
Feedback Form |
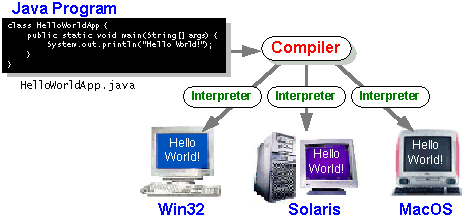
for Your First ProgramThe following instructions will help you write your first Java program. These instructions are for users of the Mac OS platform.
1. A Checklist 2. Creating Your First Application
a. Create a Java Source File
b. Compile the Source File
c. Run the Program3. Creating Your First Applet 4. Where to Go from Here Your feedback is important to us! If you have comments about these instructions, send them to: tutorial@java.sun.com. In your message, put cup of java in the subject header. This page was adapted for Mac OS by tutorial reader Werner van Mook.
To write your first program, you will need:
1. A ChecklistThese three items are all you need to write your first Java program.
- A development environment for the Java platform. You can download
the Macintosh Runtime Environment for Java Software Development Kit (MRJ SDK) from Apple's website.
- A runtime environment for the same version of the Java platform. You can download
- A text editor. In this example, we'll use SimpleText, the simple editor included with the Mac OS platforms. To find SimpleText, from the File menu select Find, type in "SimpleText", and then hit the Find button. You might find more then one SimpleText application; any one of them should work fine. You can easily adapt these instructions if you use a different text editor.
a. Create a Java Source File.
You have two options:
- You can save the file
on your computer and avoid a lot of typing. Then, you can go straight to step b.HelloWorldApp.java
- Or, you can follow these (longer) instructions:
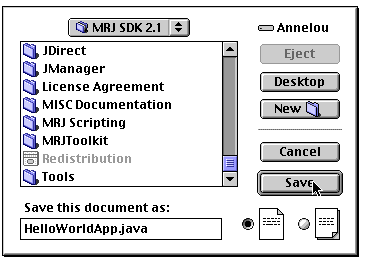
1. Start SimpleText. In a new document, type in the following code:
/** * The HelloWorldApp class implements an application that * simply displays "Hello World!" to the standard output. */ class HelloWorldApp { public static void main(String[] args) { // Display "Hello World!" System.out.println("Hello World!"); } }2. Save this code to a file. From the menu bar, select File > Save As. In the Save As dialog box:
Be Careful When You Type Type all code, commands, and file names exactly as shown. The Java compiler and interpreter are case-sensitive, so you must capitalize consistently.
HelloWorldApphelloworldapp
- Specify the folder where you'll save your file. In this example, the folder is
MRJ SDK 2.1.- In the Save this document as: text box, type
HelloWorldApp.java.When you're finished, the dialog box should look like this:Now click Save, and exit SimpleText.
b. Compile the Source File.
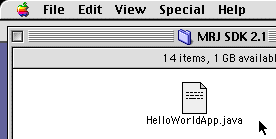
Go to the folder MRJ SDK 2.1 and it should look something like this:
There will be a folder called Tools. In this folder there is a folder called MRJTools.
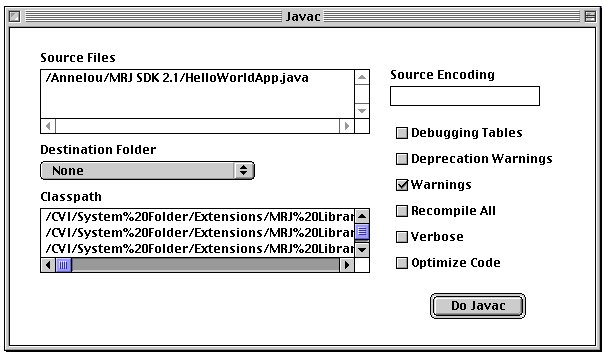
Open it. You will see a program called javac.Now drag and drop your HelloWorldApp.java onto this Javac application. Javac will now open and should show you:
In the box Source Files it gives you the absolute path to the java file we just created. For now we do not have to do anything else except clicking on the Do Javac button.
If you do not get any error messages, congratulations. You have successfully compiled your program.
Error Explanation
If you drag and drop your .java file on top of the
                  javac program and the file is moved on top of the javac
                  application.
When you tried this and the only thing that happens
                  is your .java file gets copied/moved on top of your javac
                  application you have to rebuild your desktop.
To do this you have to restart you computer and press
                  and hold both the "Apple" - and "Alt" key until you get a
                  window asking you if you really want to rebuild your
                  desktop.
Answer with yes. When your computer is finished you
                  should be able to drag and drop the .java file on to
                  javac.
The compiler has generated a Java bytecode file,HelloWorldApp.class. Look in the same folder where you saved the .java file and you will see the .class file.Now that you have a .classfile, you can run your program.
c. Run the Program.
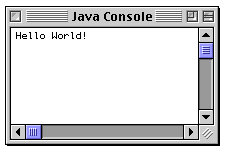
In the MRJ SDK 2.1 folder there is a folder called JBindery. Open this folder and there should be an application called JBindery.Drag and drop the HelloWorldApp.class file on top of the JBindery icon.
If you now get:
Congratulations! Your program works.
3. Creating Your First Applet
HelloWorldAppis an example of a Java application, a standalone program. Now you will create a Java applet calledHelloWorld, which also displays the greeting "Hello world!". UnlikeHelloWorldApp, however, the applet runs in a Java-enabled Web browser such as HotJava, Netscape Navigator, or Microsoft Internet Explorer.To create this applet, you'll perform the basic steps as before: create a Java source file; compile the source file; and run the program.
a. Create a Java Source File.
Again, you have two options:
- You can save the files
HelloWorld.javaand
Hello.html
- Or, you can follow these instructions:
1. Start SimpleText. Type the following code into a new document:
import java.applet.*;
import java.awt.*;

/**
 * The HelloWorld class implements an applet that
 * simply displays "Hello World!".
 */
public class HelloWorld extends Applet {
    public void paint(Graphics g) {
        // Display "Hello World!"
        g.drawString("Hello world!", 50, 25);
    }
}
Save this code to a file called
HelloWorld.java.2. You also need an HTML file to accompany your applet. Type the following code into a new SimpleText document:
<HTML>
<HEAD>
<TITLE>A Simple Program</TITLE>
</HEAD>
<BODY>
Here is the output of my program:
<APPLET CODE="HelloWorld.class" WIDTH=150 HEIGHT=25>
</APPLET>
</BODY>
</HTML>
Save this code to a file called
Hello.html.Make sure that your files HelloWorld.java and Hello.html are in the same folder.
b. Compile the Source File.
Compile the HelloWorld.java source file using javac.
The compiler should generate a Java bytecode file,
HelloWorld.class.
c. Run the Program.
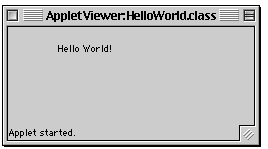
Although you can view your applets using a Web browser, you may find it easier to test your applets using the simple Applet Runner application that comes with the JavaTM Platform. To view the HelloWorld applet using Applet Runner, Open the folder Apple applet viewer in the MRJ SDK 2.1 folder. There should be an application called Apple Applet Runner.
Drag and drop your Hello.html file on this application.
Now you should see:
Congratulations! Your applet works.
top
4. Where to Go from Here
To continue your introduction to the Java programming language, check out these trails:
Getting Started 
Learning the Java Language
About the
        Author
Werner van Mook transformed the original Win32 Cup of Java to this Macintosh version.
Werner is an employee of Syntegra based in The Netherlands and a soon-to-be Certified Java Developer.
After seven years of delivering Macintosh support he switched to the windows platform and got his MCSE+I in eleven months. Since December 1998 he is a B. of Sc. in informatics.
|
|
Start of Tutorial > Start of Trail > Start of Lesson |
Search
Feedback Form |